Scrappy Log Cabin Coasters – Modern Patchwork Spring 2014

The new issue of Modern Patchwork is out, and my scrappy log cabin coasters are featured in the issue! You can find the issue on Interweave’s site. The issue also features some cute pillow patterns, wallets and coin pouches, and some beautiful modern quilts from their double wedding ring challenge.

Scrappy Log Cabin CoastersThese coasters are made using liberated quilting techniques. There are a number of other names for this style of quilting – intuitive quilting, free form quilting, improv quilting, among others. I was first introduced to this style of quilting through Gwen Marston, and I also admire Jean Wells, Rayna Gillman, and the Gees Bend Quilters. Basically, rather than cut your fabric perfectly straight and sew everything at a 90° angle, you cut freeform using scissors and sew on strips at slight angles to create a slightly askew but dynamic design.

Scrappy Log Cabin Coasters

If you want to learn more about liberated quilting, I would recommend Liberated Quiltmaking by Gwen Marston, Create Your Own Free Form Quilts by Rayna Gillman, and Intuitive Color & Design by Jean Wells. The coasters are an easy and cute project to get started and a set of 4 would make a really nice handmade gift!


Sprig and Vine – New Hope, PA

Laura and my birthdays were both in the last month, so we decided to jointly celebrate by going to dinner at Sprig & Vine, a vegan restaurant in New Hope, PA. The chef/owner used to work at the now closed Horizons in Philly. The atmosphere was nice – quiet and relaxed even though the food is fancy.

They have a lunch, dinner, and brunch menu. As tempting as brunch was, we decided to go for dinner. I ordered the blackened tofu, and it was really yummy. It came with sweet potatoes mashed with coconut (milk, I think). It’s not a combo I would have thought of, but the flavors really work well together.

Sprig & Vine - Blackened Tofu

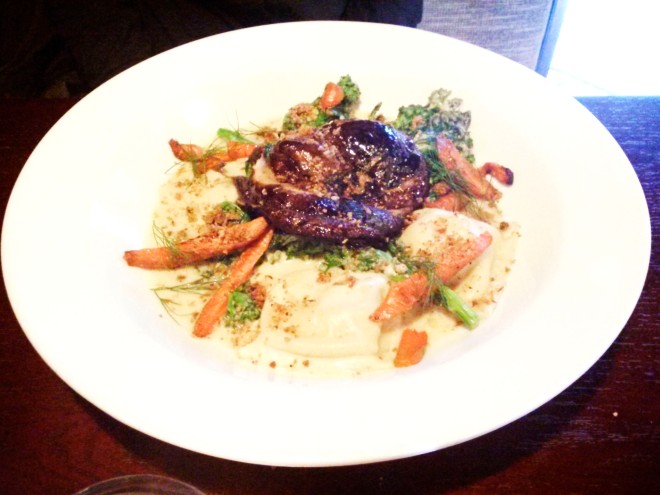
Laura got the Parsnip and White Sweet Potato Ravioli. As good as my tofu was, I think the ravioli dish was the star of the show! The ravioli filling has a lot of fennel in it giving the ravioli a slight taste of licorice, which we both really liked. The cashew cream sauce was really good as well.

Sprig & Vine - Ravioli

Try as we might, we couldn’t leave without dessert! We don’t eat out at restaurants much any more, so we decided to treat ourselves. Laura got vegan tiramisu, which was really good! I love tiramisu and haven’t tried making a vegan version yet.

Sprig & Vine - Tiramisu

I ordered the Chocolate Mousse Pie with a black cocoa crust which turned out to be my favorite. It came with a little scoop of sesame tahini ice cream and was drizzled with salted caramel. The mousse was smooth and creamy and not overly sweet. The salted caramel added a little extra sweetness and saltiness. And the caramel with the sesame ice cream was a really amazing combo. Sesame is one of my favorite flavors, and I don’t know why I never thought of making sesame ice cream before! I will definitely have to make this at home.

Sprig & Vine - Chocolate Mousse

It was a great way to celebrate our birthdays! We’d been wanting to go for a while, and it was really worth the wait. If you find yourself in New Hope, you should definitely give it a try!

Mother’s Day Sale – Free Shipping on Pendants at The Creative Kat Etsy Shop!

Mother’s Day is less than a month away!  If you’re looking for something unique to give your mom this year (of if you just want to treat yourself) my handmade fused glass pendants make great gifts! I recently added some of my new pendants to my Etsy shop – The Creative Kat.

I’ve gotten good feedback from customers at craft shows who have given them to friends and family members and they love them. It’s a fun surprise to open up a package and see a little brightly colored pendant. Each one is different so it truly is a one of a kind gift! Since I really appreciate the readers of my blog and the little vegan community we have, and in honor of Mother’s Day, from now until May 11th, you can get free shipping on any orders in the US. At checkout, use the coupon code: MOTHERSDAY14

The Creative Kat Mother's Day Sale!

Just to give you a sneak peek – here are some of the new pendants!

Six Fruit Vegan Crumb Pie

Sometimes I like to just make it up as I go in the kitchen. It can be fun to experiment and see what you come up with! I had some leftover pie crust after making a pot pie, and I had a variety of frozen, fresh, and dried fruit. I didn’t have enough of any one or even any two fruits to make a pie, but altogether I had just enough. So I went with the ‘kitchen sink’ way of cooking – throw in everything but the kitchen sink. I had frozen strawberries, frozen mixed berries (blueberries, raspberries, strawberries), frozen mango, a fresh apple, and dried apricots.

I topped it off with some crumb topping and the result was surprisingly yummy! If one fruit makes a tasty pie, then six make an extra tasty pie. The flavors blended really well together, and I think I’ll be mixing fruits in pies more often!

Kitchen Sink Six Fruit Pie

Ingredients:

1 batch of pie crust for a crust on top and bottom, or half a batch for a crust on bottom and crumb topping on top
4-5 cups of fruit ( I used 2 cups of frozen berries, 1 cup of frozen mangos, 1 fresh apple, and about 1 cup of dried apricots)
1/2 cup sugar
1 1/2 Tbsp cornstarch
1 1/2 tsp cinnamon
pinch of nutmeg
pinch of salt
zest of 1 lemon

Crumb Topping Ingredients:

1 cup flour
1 cup sugar
1/4 cup vegan butter

Directions:

  • Prepare your dough and refrigerate for at least 1/2 an hour before using. Preheat the oven to 350°.
  • If you’re using frozen fruit, defrost it. Chop the fruit and place it in a large bowl. Add the sugar, cornstarch, cinnamon, nutmeg, salt and lemon zest. Stir until all of the fruit is evenly coated.
  • Prepare the crumb topping. Place the flour and sugar in a bowl. Cut in the butter using a pasty blender, fork, or even your hands. You could also use a stand mixer on a low setting until it’s reaches a crumbly texture. Don’t over mix or it will eventually turn into dough rather than crumb.
  • If you made a full batch of pie dough, split it in half and roll out one half on a floured surface. It should be rolled to about 1/4 inch thickness. Pick up the dough using the rolling pin to support it and place it in the bottom of the pie dish. Trim excess dough and crimp the edges.
  • Pour your fruit mixture into the pie crust and spread it out evenly. Top the pie with the crumb topping. Or, if you’re putting a crust on top, roll out the crust, place it on top of the pie, trim the excess, and crimp the edges. You’ll also want to poke a few holes in the top crust with a fork so steam can vent out.
  • Bake the pie at 350° for 45-60 minutes. The crumb should be starting to turn golden, and the fruit juices should be bubbling around the edges.

Jim Lahey’s No-Knead Pizza Dough with Asparagus, Red Onion, Artichoke, and Pistachios

A couple of my friend’s and I are planning a pizza party later in the month since we’ve all been on a quest to learn how to make good pizza at home. I’ve been making my own pizza for a while now, but it’s always fun to try out new pizza dough recipes. I’m in charge of bringing dough to the party, so I’m trying out a few different recipes to find the best one. First up is Jim Lahey’s No Knead Pizza Dough. Check out his recipe and video. His key to good pizza crust is handling the dough gently and baking at a high temperature.

The recipe says that it makes enough for 4 pizzas, but those would be very small pizzas – good for personal size pizzas. I cut the batch in half and made one normal sized pizza out of the half batch. Like no-knead bread recipes, the dough needs to rise for a long time. I made the dough a day ahead of time and let it rise about 18 hours. I put my pizza stone in the oven and set the oven to preheat to 500°. I tried stretching the dough out like he shows in the video, but my dough turned out fairly sticky and fragile, so I couldn’t stretch it by hand without it breaking. Next time I will try cutting back on the water a little to see if it turns out a little less sticky and easier to work with. I ended up putting the dough on a piece of parchment paper that I drizzled with olive oil. I was able to stretch the dough out on the parchment paper and put toppings on.

Pizza

I tried to gently pick up the parchment paper to place the pizza directly on the pizza stone, but there was no way I was going to be able to transfer it without it sliding off or dropping it. Instead, I slid it onto a metal pizza pan and put that on top of the hot pizza stone in the oven. His recipe calls for baking the pizza for only 3 minutes, however I ended up baking it at 500° for 5 minutes, then lowered the temperature to 450° and baked it for another 10 minutes until it looked done.

Pizza Slice

The bottom of the crust turned out really well. Despite being hard to work with, I think this is the best pizza dough I’ve made at home. It was nice and crispy, but firm enough to hold all the toppings. The edges were still a bit doughy, but good. If I’d been able to stretch it out further, I think the edges would have been crispier as well. I would definitely make this recipe again and play with the amount of water to flour to get a more flexible dough. The toppings were a perfect combo that I will definitely try again. The asparagus, pistachios, red onion, and artichoke went especially well together. Next up, I want to try the pizza recipe from the book The Bread Baker’s apprentice. Do any of you have favorite pizza dough recipes or toppings I should try?

Update: I made this recipe again and it turned out perfectly! If you stick to the exact amount of water in the recipe, it will seem dry as you’re mixing it, but don’t add any extra water. Just keep folding it and it the extra flour will eventually incorporate. This leaves you with a dough that is much easier to stretch out by hand. Stretch the dough into a 6-8 inch round and let it rest for a few minutes, then continue to stretch it out to it’s full size. Place the dough on the pizza stone and pre-bake it for 3-4 minutes. Then take it out and top it and finish baking for 3-4 minutes. This creates a crispy, but still chewy soft crust.

Ingredients:

1/2 batch of Jim Lahey’s No Knead Pizza Dough
10-12 stalks of asparagus
1/2 red onion
2 shallots
4-5 cloves of garlic
1/2 cup of shelled pistachios
pepper
salt
dried rosemary
2-3 chopped artichoke hearts

Directions:

  • Prepare the dough ahead of time and let it rise overnight for about 18 hours. Once it’s ready, place your pizza stone in the oven and preheat the oven to 500°.
  • Snap off the ends of your asparagus and break or cut the stalks into bite sized pieces. Thinly slice the red onion and shallots. Press or mince the garlic. Saute the asparagus, onion, shallots, and garlic in a little olive oil.
  • Stretch out the dough being careful not to put holes in it. If you do, try to patch them up. As I mentioned earlier, I had the best luck stretching the dough out on lightly oiled parchment paper.
  • Top the pizza with the sautéed veggies, pistachios, salt and pepper, dried (or fresh) rosemary, and artichoke hearts.
  • If you can, slide the pizza directly onto the pizza stone. Otherwise, place it on a metal pizza pan and then on the pizza stone like I did.
  • Bake the pizza at 500° for 5 minutes. Lower the temperature to 450° and bake 10 more minutes or until the crust looks golden brown.

Vegan Loaded Nachos

Hi Friends! I’ve been on a bit of a blogging hiatus as my year has been busy so far, but I have some new recipes to share. Before we get to the recipe, I wanted to say that I have happily been volunteering quite a bit at a local no-kill animal shelter. If you have the time, consider finding a no-kill shelter near you where you can volunteer. It’s been really rewarding interacting with the animals and giving them a chance to get outside and play while they wait to be adopted. The hardest part is not taking them all home with you! This guy in particular was nearly impossible not to take home, but I can’t really have a dog right now. Luckily he got adopted by a nice family. So many of the pups are just so loving and sweet!

Kincaid

On to the recipe…I guess this isn’t as much of a recipe as a recreation of vegan nachos that I used to get at Rutherford Pancake House in Rutherford, NJ. When I lived in North Jersey this was my favorite brunch spot and we almost always got the nachos. Now that I live too far away, I make my own vegan nachos at home. These are perfect for sharing at a party or enjoying while binge watching Netflix. And when football season comes around again, you won’t have to feel left out at football parties! These are really dangerously yummy. If you have a favorite vegan nacho topping, let me know in the comments! I would love to get some new ideas to try.

As messy as nachos are, it's hard to make them look pretty when you pile on the chili, guacamole, vegan sour cream and more, but they are so yummy it doesn't matter! They will disappear quickly!

As messy as nachos are, it’s hard to make them look pretty when you pile on the chili, guacamole, vegan sour cream and more, but they are so yummy it doesn’t matter! They will disappear quickly!

Ingredients:

Tortilla chips
Daiya vegan cheese
1 can of vegan chili (I used Amy’s brand)
Guacamole
Salsa
Tofutti Vegan Sour Cream
Lettuce

Other Optional Toppings:

Corn
Tomatoes
Jalapeños
Refried Beans
Black Beans or Kidney Beans
Sautéed or Grilled Pepper and Onions
Veggie Bacon
Chopped Cilantro
Scallions
Lime Juice
Black Olives

Directions:

  • Preheat the oven to 350°.
  • Fill a glass baking dish 2/3 full with tortilla chips. Sprinkle on a little Daiya cheese. Add the can of vegan chili on top. If you have leftover homemade chili, this is a great way to use it up.
  • Bake the nachos in the oven for about 15 minutes so the chili is hot and the cheese is melted.
  • Remove the nachos from the oven and top with guacamole, salsa, vegan sour cream, lettuce and any other toppings you like.
  • Dig in and enjoy!

No Knead Rye Bread

Hope you all had a wonderful holiday season and a Happy New Year! Though I did a lot of cooking and baking the last couple weeks, I didn’t get around to posting much since the holidays are always so busy. I wanted to share a bread recipe with you that I made over the holidays. I was lucky to receive a dutch oven for Christmas (thanks Roseann!) and I’ve already put it to good use baking bread twice. I’m seriously addicted to no-knead dutch oven bread now. This might become a weekly thing since it takes so little time, and it’s really nice having fresh homemade bread around.

This recipe is one that my sister shared with me that originally comes from Breadtopia and is called Rick’s No-Knead Rye. We made a few small changes to the original recipe. It turned out really well! The crust is nice and chewy from baking in the dutch oven and the inside is a nice soft texture. It’s not as airy and light in the middle as some other no-knead bread since it doesn’t have as much yeast as other recipes, but this makes it a great choice for sandwiches!

If you haven’t made no knead bread before, take a look at my Artichoke and Roasted Garlic Bread Recipe first. I compiled links and information about dutch ovens and other baking options, how steam helps in the baking process, etc.

NoKneadRye

Ingredients:

heaping 1/4 tsp yeast
1 3/4 cups luke warm water
pinch of sugar
1 1/2 cups bread flour
1 cup whole wheat flour
1/2 cup rye flour
1 1/2 tsp salt
2 Tbsp caraway seeds

Directions:

  • In a large mixing bowl, combine the yeast with luke warm water and a pinch of sugar. Allow the yeast to proof for 5-10 minutes.
  • Add the flours, salt, and caraway seeds. Stir until all ingredients are well combined and formed into a dough.
  • Cover the dough with a kitchen towel and let it rise for 12-18 hours on the counter.
  • Turn the dough out onto a piece of parchment paper and gently form it into a loaf. Set it aside to rise for another hour or so.
  • Place a dutch oven in the oven while it’s cold and preheat the oven to 500°F.
  • Place the parchment paper and dough into the dutch oven and cover. The parchment paper makes it easy to transfer the dough into the hot dutch oven and it keeps the bread from sticking to the bottom. Bake the bread covered for 30 minutes.
  • Then uncover the bread, lower the temperature to 400°F and bake for 15 more minutes.
  • Once the bread is done baking, turn the oven off and let the bread sit in the oven an additional 15 minutes. Let cool, and enjoy!

New Batch of Pendants & Felt Ornaments!

Before showing you my newest creations, I’m excited to say that my Artichoke and Roasted Garlic Bread won in the bread category of the Virtual Vegan Potluck! Thank  you all for your votes and congratulations to the other winners!

I recently made up a new batch of pendants and wanted to share some new photos with you. If you’re looking for a unique gift for the holidays, a handmade pendant, a pair or earrings, or a bracelet might be the perfect thing!

KMDisplay

Though I have quite a few pendants made up, my inventory varies as they are sold since each pendant is one of a kind. It’s hard to keep up with photographing each and every pendant separately, but if you see one that you like in these photos, let me know and I’d be happy to send you more photos of that particular pendant.

KMPendants

Many of the pendants can be paired with matching earrings or a bracelet, which makes a nice gift set! I also have others listed on Etsy in my shop, The Creative Kat.

KM6PenantEarrings

Each pendant, bracelet, or pair of earrings comes in a cotton lined jewelry box. The pendants come on your choice of a chain, cord, or ribbon necklace. Pendants are $20, earrings are $15, and bracelets are $30. If you buy a pendant and earrings together, it’s only $30 for the set, and if you buy a bracelet and earrings together, it’s only $40 for the set.

KMBracelets

In addition to the fused glass jewelry, I also have adorable hand sewn felt ornaments for sale!

KMFelt

They are each $15, however if you are buying multiples I can give you a bit of a discount. If you are interested in purchasing an ornament, let me know which style you would like and if you have color preferences – raccoon, fox, owl, elephant, fish, flower, squirrel, ladybug, cat, gnome, or Santa Claus. Certain ornaments pictured are already sold or are for custom orders, but I can make more of these designs upon request.

If you’re interesting in purchasing anything or have any questions you can leave me a comment on this post or email me at madebykathryn@gmail.com. Thanks for looking! I hope you are all enjoying the holiday season!

Welcome to the Virtual Vegan Potluck – Artichoke and Roasted Garlic Bread!

Welcome to the Virtual Vegan Potluck! I’m so excited to be participating again and bringing you a yummy new bread recipe! If you just happened upon my blog and don’t know what the Virtual Vegan Potluck is, check it out! You can start at the beginning of the potluck at Vegan Bloggers Unite! To see the blog before mine in the potluck go back to Spontaneous Tomato. To see the blog after mine in the potluck go forward to Bite Me, I’m Vegan. Thanks to Annie from An Unrefined Vegan for all her hard work  organizing the potluck!

Now, on to the recipe! I decided to share my recipe for no-knead artichoke and roasted garlic bread! This is a perfect bread to eat on it’s own, with a little vegan butter, as a sandwich, or even with some vegan artichoke or spinach dip! It has a subtle, but present artichoke and roasted garlic flavor. You could also throw in some chopped olives if you want a stronger, punchier flavor.

Artichoke & Roasted Garlic Bread

This is a really simple no-knead recipe, that doesn’t take much time to prepare. It does take two days to actually make the bread, but most of that time is spent waiting for the bread to rise. There is little actual work involved. Here are a few tips before we get started.

  • Ideally you want to bake the bread in a pot meant for bread baking, such as a dutch oven. If you don’t have a dutch oven, you can use a regular pot with a lid, as long as it is safe in the oven at high temperatures. Take a look at this article for more info. My pots unfortunately have handles that aren’t metal so I didn’t want to risk them melting in the oven. I used a pizza pan and tin foil instead, which isn’t ideal, but it worked out pretty well. The crust still got nice and crispy. A dutch oven is on my wish list!
  • Baking bread with steam helps the bread form a nice crust. Placing a pan in the oven to preheat, and then adding water will create steam. For more info on how steam helps during bread baking, read this. You only need to leave the steaming water in the oven for the first 10 minutes of baking.
  • The bread rises for 16-20 hours, so plan out when you want to bake the bread and prep the dough accordingly. I made my dough at 11am so my bread baking window was 3am to 7am. I ended up having to wake up early to bake the bread, which wasn’t a big deal, but it’s good to do some quick math and think out your timing first!

Artichoke & Roasted Garlic Bread

Ingredients:

3/4 tsp active dry yeast
1 tsp sugar
1 1/2 cups water (divided)
3 cups of bread flour
1 tsp salt
1 can of artichoke hearts packed in water
1 head of roasted garlic

Directions for Roasted Garlic:

  • Prep your roasted garlic ahead of time. I made mine the day before so it was cool enough to touch when I was making the dough. Preheat the oven to 400°.
  • Cut the top off of a whole head of garlic.
  • Place the garlic on a piece of tin foil and drizzle a little olive oil on top. Wrap the tinfoil around it and place it in the oven for 35 to 45 minutes. The garlic will look a little browned when it’s finished.
  • Once they’re done and cooled, you can store the garlic in the fridge until you’re ready to add it to the dough.

Directions for the Bread Dough:

  • In a small bowl, combine the yeast and sugar. Add 1/2 cup of warm, but not too hot, water. Let this sit for about 5-10 minutes to allow the yeast to proof.
  • While you’re waiting, drain the artichoke hearts very well and chop them into small pieces. Squeeze the roasted garlic cloves out of the head of garlic. They should pop out pretty easily. Mash up the garlic cloves.
  • In a large bowl, combine the flour, salt, proofed yeast mixture, and the remaining water (which should be lukewarm). Stir the mixture until it just starts to pull together, then add in the chopped artichokes and roasted garlic. Stir until well combined. This is a no-knead dough, so it’s okay that the dough is stickier and wetter than a kneaded dough would be.
  • Cover the dough with a clean dishtowel and allow it to rise for 16-20 hours.

Before and After Rising

  • When it’s close to done rising, preheat your oven to 475°. Place an empty metal pan on the bottom shelf of the oven to preheat. Once the oven is hot, you will place water into the pan to create steam, so make sure it’s deep enough to hold water.
  • Roll your dough out onto a generously floured surface. Fold it over a couple times to form a loaf. Sprinkle flour on top of the loaf and slice a vent into the loaf. Place the loaf in a dutch oven, an oven-safe pot with a lid, or on a pan covered with tin foil (see note above).
  • Carefully pour some water into the pan on the bottom shelf, and place your bread on the top shelf (see note above).
  • After 10 minutes of baking, carefully remove the pan of water. Allow the bread to keep baking covered for another 20 minutes, then remove the foil or lid and bake for 20 more minutes (50 minutes total baking time).
  • Remove the bread from the oven and allow it to cool. Enjoy!

I hope you enjoyed the recipe and that you’ll stop by The Vegan Kat again sometime! To continue on in the Virtual Vegan Potluck click the links below!

go_forwardgo_bck

New Felt Ornaments!

The Virtual Vegan Potluck is tomorrow! I hope you’ll all come back and check out my contribution to the bread category. It’s definitely a yummy one. In the meantime, I couldn’t wait to share the new ornaments that I’ve been making with you!

Felt Ornaments

After venturing into making little stuffed creatures, like the elephant cat toys in my previous post, I’ve gotten a bit hooked on creating new patterns. Since the holidays are coming up, I thought it would be fun to turn these little stuffed creations into ornaments. I will now have these cuties with me at my craft shows, and I can post some on Etsy if you are interested in purchasing them from afar. I currently have elephants, owls, raccoons, foxes, gnomes, fish, and a Santa Claus. I hope to work on some new designs in the coming weeks. As a side note, these ornaments are vegan and are not made of wool. The felt is made of recycled plastic bottles, so they’re “green” too! It has a very soft feel to it, and it’s nice to work with!

Tomorrow I will be at the Rancocas Valley Regional High School Fall Crafter’s Marketplace in Mount Holly, NJ. The show goes from 9-3. If you’re in the area, stop by! It’s a great time to pick out some gifts for the holidays! As always, you can also find pendants on my Etsy shop, The Creative Kat, and I’m happy to post other pendants, earrings, bracelets, and ornaments on request.